


Gradle is an open-source build automation tool. It comes with two DSL(Doman Specific Language) Kotlin and Groovy. The two are used to create build scripts. Kotlin is newer as compared to Groovy which has been around for a longer period. Gradle is a convention based build tool. It lets you know where to find source files , resources etc. unlike other build tools such as Ant . To top it up , it is highly configurable.
The build scripts contain plugins which defines tasks. Tasks are basically a piece of work that a build performs.
Installing Gradle
There are various options for installing Gradle depending on the environment you are using. Installation can be directly form their website, using an SDK Manager or a manual install. Visit the website here for installation guide.
Running Gradle For the First Time
In order to use Gradle you have to create a build script using the DSL. As mentioned earlier ,the two flavors of DSL are Kotlin and Groovy. The build scripts can be executed either from the command line or the IDE.
Let's have a look at a simple build file.
tasks.register("hello"){
    doLast{
        println("Hello Gradle!!")
   }
}
This build file is written using the Kotlin DSL. The task here is called Hello. To run gradle on the command line just time gradle followed by the name of the task gradle [taskname]. In our example hello is the name of the task. So to execute it we will type gradle hello on the command line and hit enter
Understanding Projects and Tasks
Gradle mostly consists of projects defined by build gradle files and tasks. These tasks are executed as part of the project. Some example of tasks may include a build tasks that helps us to build the project and clean tasks that helps us to clean the project. For example in an Android Studio project when you open build.gradle(Project) you will notice this code snippet at the bottom
task clean(type: Delete) {
    delete rootProject.buildDir
}
This tells gradle to clean the root build directory. In projects you can introduce tasks indirectly by adding plugins.
Writing Tasks
A Gradle build has three distinct phases.
- Initialization Phase - Gradle supports single and multi-project builds. During the initialization phase, Gradle determines which projects are going to take part in the build, and creates a Project instance for each of these projects.
- Configuration Phase -During this phase the project objects are configured. The build scripts of all projects which are part of the build are executed.
- Execution Phase - Gradle determines the subset of the tasks, created and configured during the configuration phase, to be executed. The subset is determined by the task name arguments passed to the gradle command and the current directory. Gradle then executes each of the selected tasks.
Let's get our hands dirty and write a simple task using Groovy syntax.🤓
task hello{
  doFirst{
    print 'Hello'
  }
  doLast{
    println(', Gradle')
  }
}
Type gradle hello on the command line to execute. Output will be as shown bello
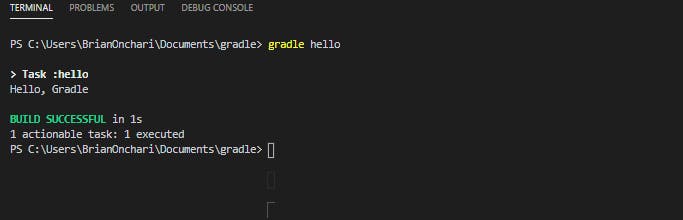
The doFirst method executes first and prints out Hello, then doLastmethod executes last and prints out , Gradle
Task Dependancies
Suppose we have a task A this task may depend on other multiple tasks
task B , task C and task D on the other hand task D may depend on another task E
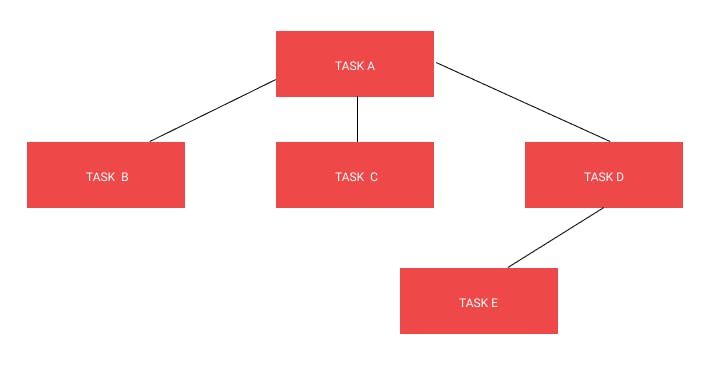 This means that
 task E must run before task D and tasks B ,C and D
must run before task A
Lets look on how to implement this dependencies in code.
task A {
  dependsOn B, C, D
  doLast{
    print 'A Depends on B,C,D '
  }
}
task B {
  doLast{
    print 'Standalone'
  }
}
task C {
  doLast{
    print 'Standalone'
  }
}
task D {
 dependsOn E
  doLast{
    print 'D Depends on E '
  }
}
task E{
  doLast{
    print 'Executes First'
  }
}
The dependsOn key word here is used to manage dependencies.
Plugins
Another way to add tasks into our projects without doing it manually is to use plugins Plugins are used to extend project execution in some way.
Here are a few ways you can add plugins into your project
plugins{ java } // Kotlin DSL
plugins { id 'java '}// Groovy
apply plugin: 'java' //Groovy
For example to add flyway plugin into our Groovy build script, we specify the plugin name and version
plugins{
     id "org.flywaydb.flyway" version "7.2.0"
}
When we run gradle tasks on the command line. The first thing gradle will do is to download all the necessary libraries required by the plugin and the plugin itself . It will the list all the tasks added for this plugin.
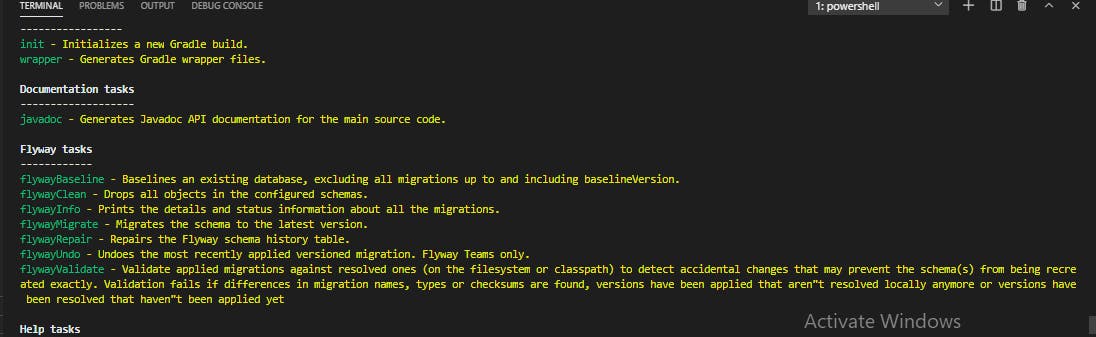
Flyway is a community plugin hence we have to use a fully qualified name. This applies to all community plugins.
Building Java and Kotlin Projects with Gradle
In order to build a project, the first thing we need to do is to create a `build file'. Once we have the build file we add appropriate plugins required for the project
Java Project
Java has three main plugins
plugins { 'java' }- This is the base plugin, contains tasks such as clean, build and .jarsplugins { 'java-library' }- As the name suggests , Its used when building librariesplugins { application }- Used to run a java application from inside a gradle file
Running gradle build generates a build folder with generated java classes and .jar classes.
Kotlin Project
The first thing to do is to add the Kotlin plugin in the build.gradle file. Since we are going to build a Kotlin code we will add a Kotlin section and specify the source sets for main and test and JVM target
plugins{
   id 'org.jetbrains.kotlin.jvm' version '1.4.10'
   id 'application'
}

kotlin{
  sourceSets{
    main.kotlin.srcDirs += 'src'
    main.kotlin.srcDirs += 'test/src'
  }
}

dependencies{
  implementation "org.jetbrains.kotlin:kotlin-stdlib-jdk8"
}

tasks{
  compileKotlin{
    kotlinOptions.jvmTarget = "1.8"
  }

  compileTestKotlin{
     kotlinOptions.jvmTarget = "1.8"
  }
}